武大胆·a year ago
是什么?
- Apache Maven是一个由 java 语言编写的软件项目管理及自动构建工具
https://github.com/apache/maven
能干什么?
项目构建和依赖管理
- 通过在项目对象模型(Project Object Model,POM)文件中添加dependency 完成依赖管理
进行项目构建生命周期中的操作执行
- 通过使用maven中的插件进行配置,完成生命周期目标管理
| 阶段 | 处理 | 描述 |
|---|---|---|
| 清理 clean | 清理项目 | 清理项目之前产出的JAR/WAR和构建信息 |
| 验证 validate | 验证项目 | 验证项目是否正确且所有必须信息是可用的 |
| 编译 compile | 执行编译 | 源代码编译在此阶段完成 |
| 测试 Test | 测试 | 使用适当的单元测试框架(例如JUnit)运行测试。 |
| 包装 package | 打包 | 创建JAR/WAR包如在 pom.xml 中定义提及的包 |
| 检查 verify | 检查 | 对集成测试的结果进行检查,以保证质量达标 |
| 安装 install | 安装 | 安装打包的项目到本地仓库,以供其他项目使用 |
| 部署 deploy | 部署 | 拷贝最终的工程包到远程仓库中,以共享给其他开发人员和工程 |
如何使用?
安装与配置
目前 IDE都是内置集成了maven,一般安装maven的目的是为了在命令行中可以执行maven的生命周期操作,完成项目编译构建。
下载
官网下载地址:http://maven.apache.org/download.cgi
C:.
│  LICENSE
│  NOTICE
│  README.txt
│
├─bin
│      m2.conf
│      mvn
│      mvn.cmd
│      mvnDebug
│      mvnDebug.cmd
│      mvnyjp
│
├─boot
│      plexus-classworlds-2.8.0.jar
│      plexus-classworlds.license
│
├─conf
│  │  settings.xml
│  │  toolchains.xml
│  │
│  └─logging
│          simplelogger.properties
│
└─lib
配置
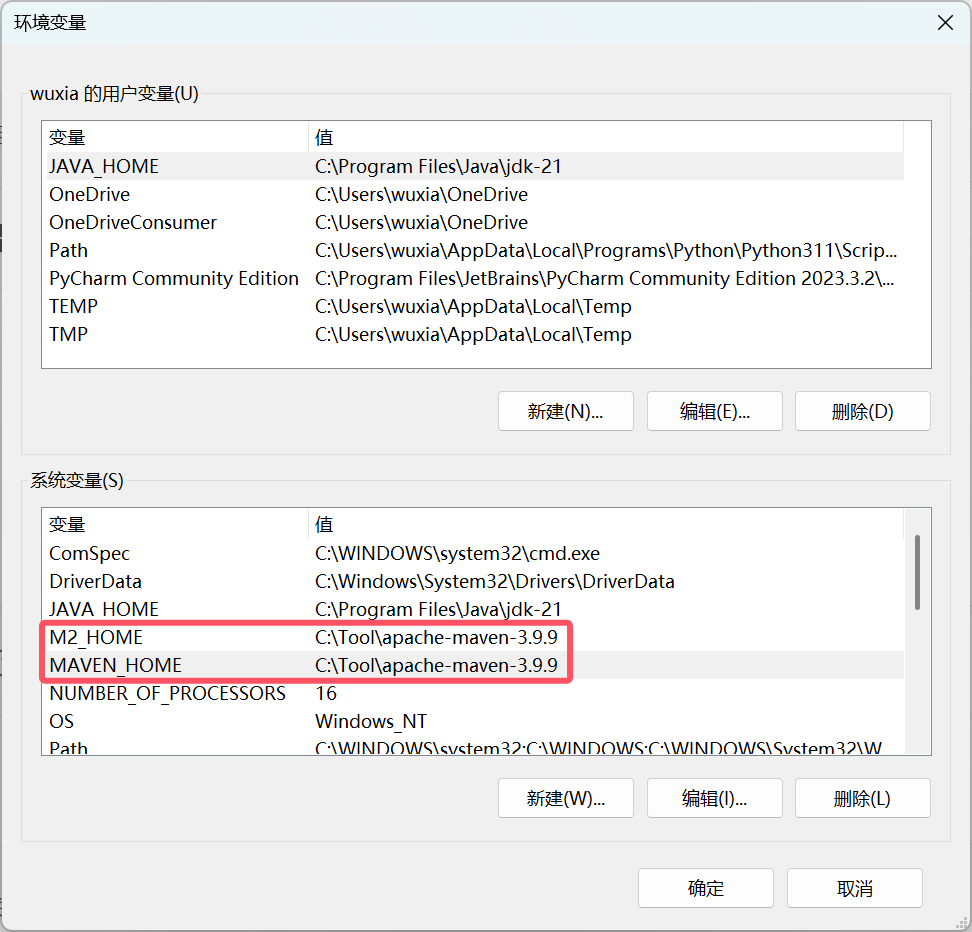
环境变量配置
- 新增系统变量MAVEN_HOME,值填写maven解压出来的根目录

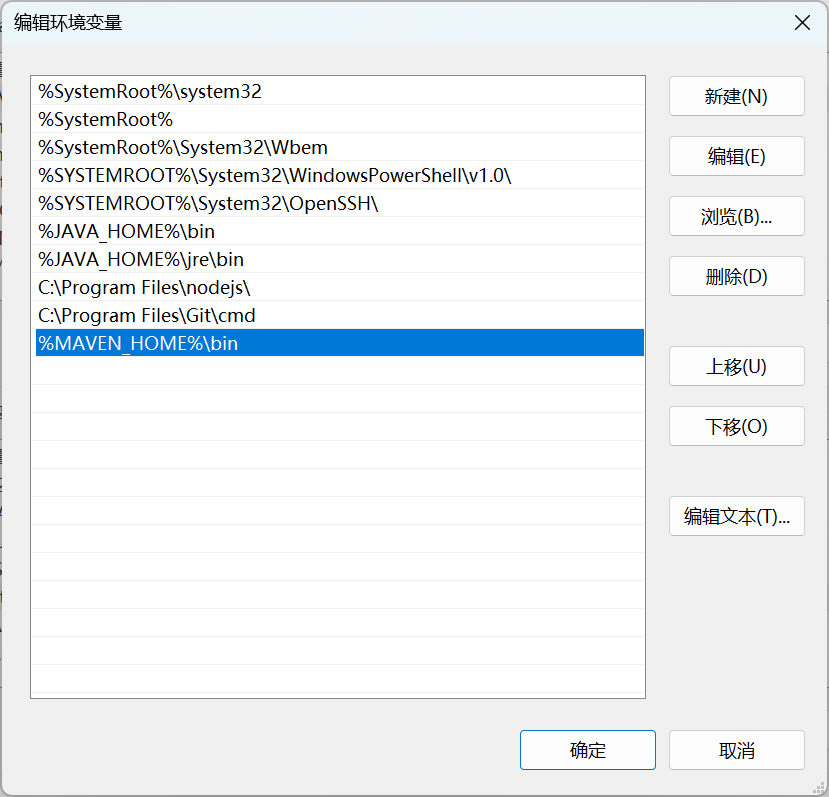
- 环境变量path中新增一条记录 %MAVEN_HOME%\bin

- 验证环境变量配置生效
打开cmd,输入 mvn -version 能够查询到maven的版本则说明maven配置成功

Maven 仓库配置
- 当需要引入依赖的jar包时,maven会在本地仓库进行查找,本地资源仓库默认在用户目录的.m2目录下的repository目录。
- 如果本地没有对应资源,就会从中央仓库进行下载。
- 由于中央仓库是境外服务器,所以需要将阿里云镜像加入到maven配置中。
- 中央仓库的修改
在maven目录的conf目录下,修改settings.xml中mirrors标签中加入如下内容:
修改完之后,把settings.xml文件复制到.m2目录下,即可以被全局调用。
<mirror>
  <id>alimaven</id>
  <name>aliyun maven</name>
  <url>http://maven.aliyun.com/nexus/content/groups/public/</url>
  <mirrorOf>central</mirrorOf>
</mirror>
[!TIP]
xml(extensible markup language 可扩展标记语言)
<元素 属性="属性值">内容</元素>
xml 中用 表示注释。
- 本地仓库的修改
<localRepository>/path/to/local/repo</localRepository>
IDEA 中的 maven 配置
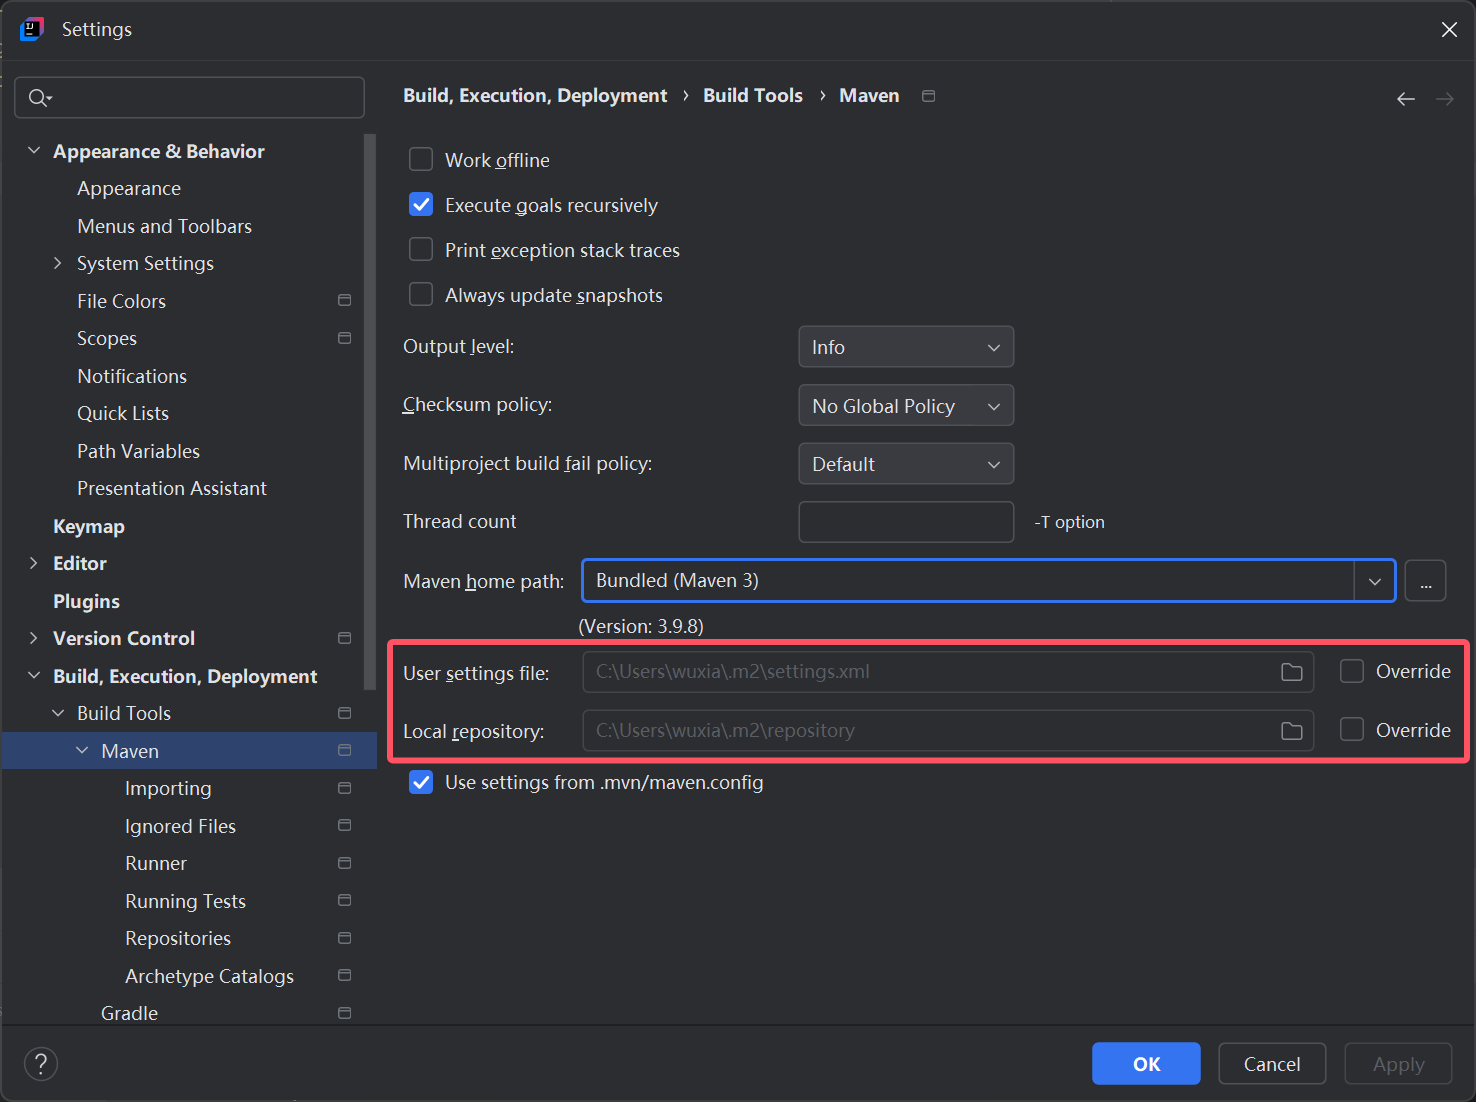
在IDEA中的File->Settings菜单里找到 Build,Execution,Deployment菜单,在Build tools菜单中
点击maven,确认User settings file文件是本地.m2目录下的settings.xml文件,仓库目录是本地.m2目录下的repository目录。

使用
管理依赖
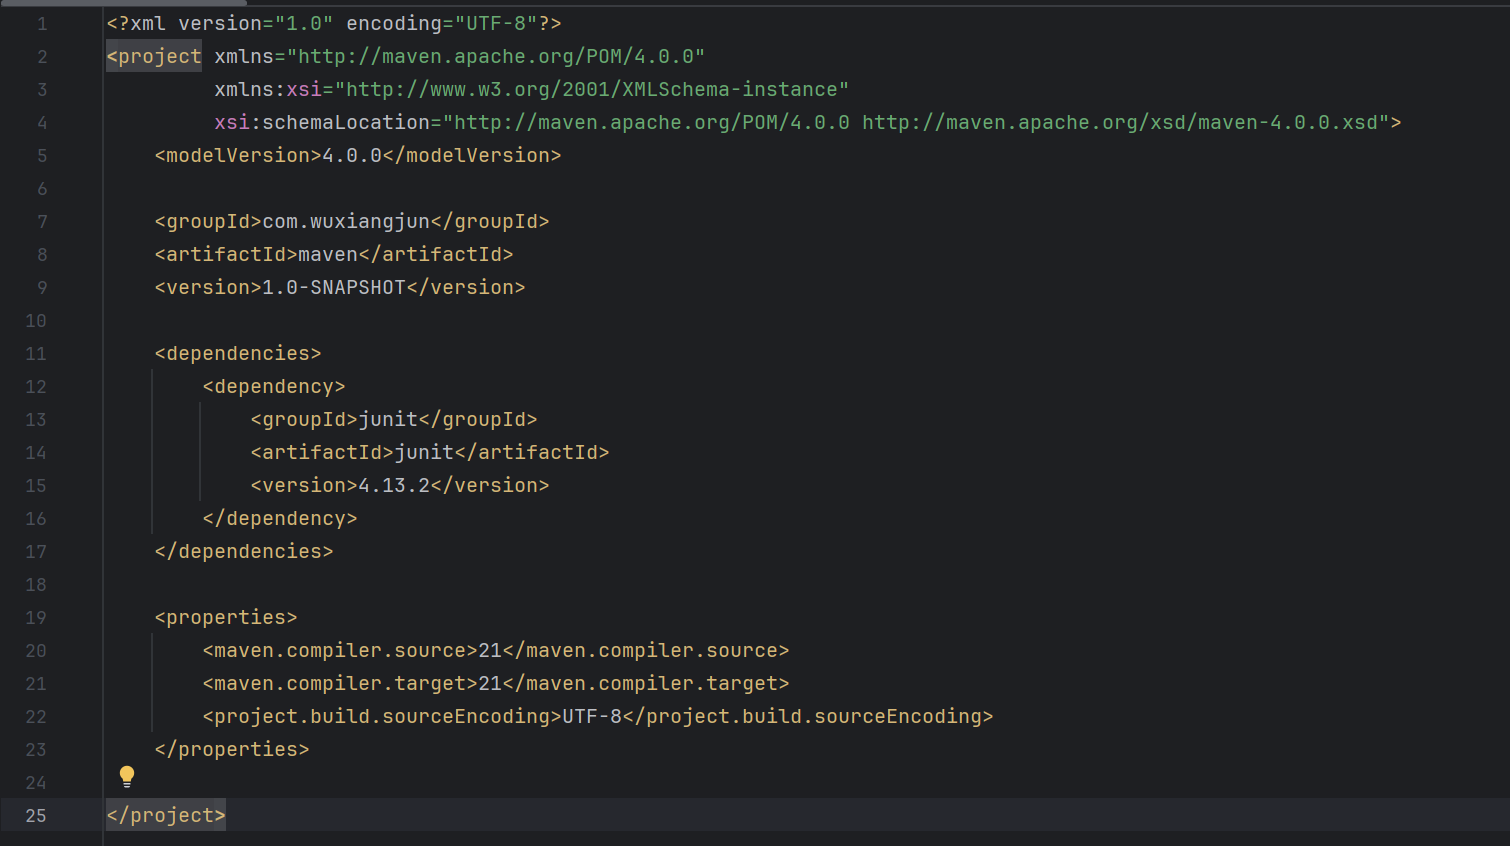
在project元素中添加dependencies,用dependency加依赖
maven引入依赖:
- 从本地仓库找
- 到中央仓库找
- 远程仓库 (自己内网搭建的仓库地址)

项目编译环境设置
    <properties>
        <maven.compiler.source>21</maven.compiler.source>
        <maven.compiler.target>21</maven.compiler.target>
        <project.build.sourceEncoding>UTF-8</project.build.sourceEncoding>
    </properties>
管理生命周期
使用不同的maven构建插件来完成生命周期动作
- 执行测试代码
- 项目中的测试代码运行可以直接通过执行test生命周期来完成;
- 在编写了测试代码的项目中,maven在完成打包操作时也会自动执行在test目录下的测试代码;
- 而如果想要定制执行部分的测试代码或者有其它需求,则可以通过引入surefire插件来完成配置;
- 在pom文件的元素里的元素里添加如下插件:
<!--            测试插件surefire-->
            <plugin>
                <groupId>org.apache.maven.plugins</groupId>
                <artifactId>maven-surefire-plugin</artifactId>
                <version>2.19</version>
                <dependencies>
                    <dependency>
                        <groupId>org.apache.maven.surefire</groupId>
                        <artifactId>surefire-junit47</artifactId>
                        <version>2.19</version>
                    </dependency>
                </dependencies>
                <!-- configuration元素可以省略,那么会默认运行/src/test/java下的所有文件 -->
                <!-- 在configuration中可以配置放在src/test/java目录下需要执行的类文件名 -->
                <configuration>
<!--                    如果要跳过单元测试执行,加上skipTests-->
<!--                    <skipTests>true</skipTests>-->
<!--    配置要执行的测试代码,配置类名即可。支持使用*做通配,比如*Test表示Test结尾的文件,也支持正则表达式-->
                    <includes>
                        <include>ErrorLoginTest</include>
                        <include>MavenJunitTest</include>
                    </includes>
<!--                    配置不执行的测试类-->
                    <excludes>
                        <exclude>LoginSuite</exclude>
                    </excludes>
                </configuration>
            </plugin>
- 打出一个可执行的jar
可直接使用 java -jar 命令进行运行
- 如果只需要打包项目为Jar,不需要生成可运行的Jar,直接顺序执行 clean 和 package操作即可。
- 如果需要打出可执行的Jar包,则需要配置运行的主类入口,在pom文件中添加元素,在其中添加插件配置并且添加assembly插件配置,如下:
				<build>
						<plugins>
							<plugin>
								<artifactId> maven-assembly-plugin </artifactId>
								<configuration>
				<!--       表示需要使用项目中依赖的jar             -->
									<descriptorRefs>
										<descriptorRef>jar-with-dependencies</descriptorRef>
									</descriptorRefs>
				<!--                   如果需要可执行的jar -->
									<archive>
										<manifest>
										<!--在这里把要运行的类填进来。 -->
											<mainClass>com.testing.class12</mainClass>
										</manifest>
									</archive>
								</configuration>
								<executions>
									<execution>
										<id>make-assembly</id>
										<phase>package</phase>
										<goals>
											<goal>single</goal>
										</goals>
									</execution>
								</executions>
							</plugin>
						</plugins>
					</build>
Drag and drop your files here
Loading comments...
Source